Quick Start Guide
This guide assumes you've already joined the minecraft server.
Spawn
When joining the server for the first time you'll spawn in a area protected by a plugin called Worldguard.
No enemy mobs will spawn for at least 30 blocks down and 120 block up in about 250 block radius so you should be relatively safe.
You can explore the world via Atlas our online map web app thats shows players location in real time. This will also show the borders for the Worldguard spawn protected area.
Click to see visual guide
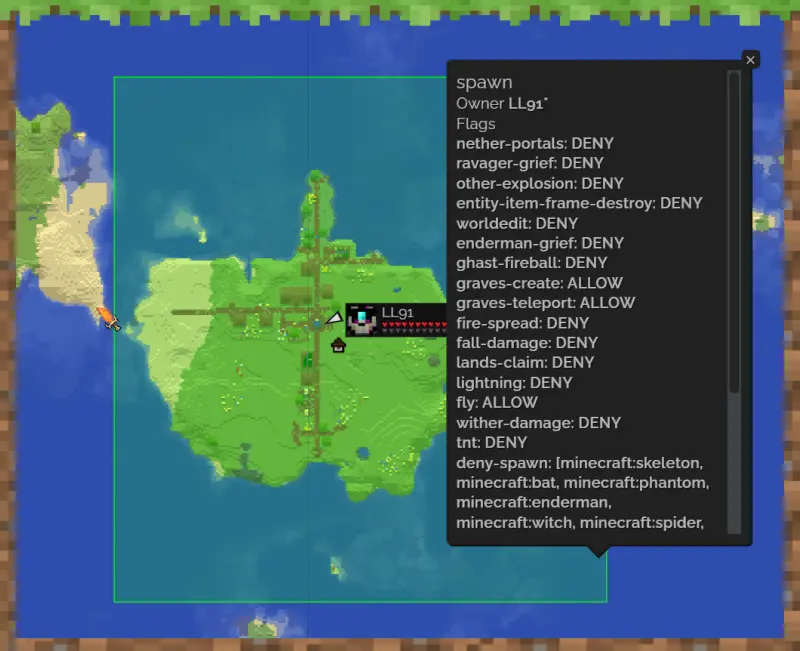
The overworld is currently 7,500 blocks radius (15,000 blocks wide) but may increase in the future as new minecraft updates come out that include new biomes.
Commands
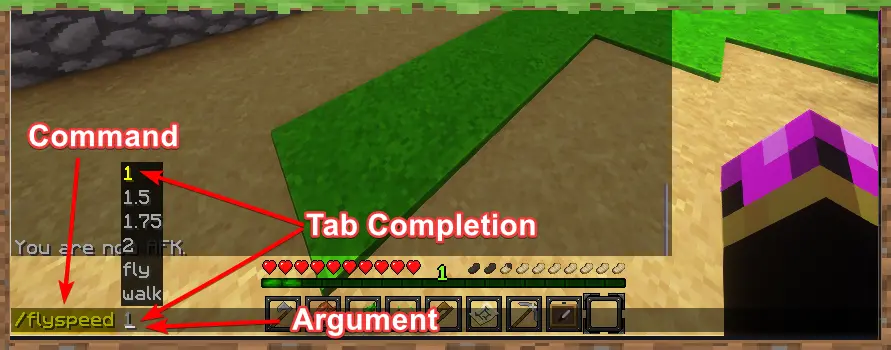
To run a command in Minecraft follow the steps below:
- Press
T(default chat key), or/(default command key). - Type
/at the start of the chat line, if there is none. - Type the command you want to run along with any arguments if needed.
- You can use auto completion by Pressing the
TABkey.
- You can use auto completion by Pressing the
- Press the enter key, the command should run on the server.
Click to see visual guide
Click to see command list
There are more commands than this list.
| Command ▲ | Usage |
|---|---|
/autosort <Chest/Inventory> | Toggles autsorting for chests you open or your inventory (off by default). |
/back | Teleport to your previous location. |
/disposal | Opens a empty chest where you can transfer items in that will delete them once you close the prompt. |
/finditem minecraft:<item> | Helps locate a minecraft item in nearby containers |
/fly | Allows flying in designated areas. |
/flyspeed <1, 1.5, 1.75, 2.0> | Sets your flying speed. |
/graves | Opens up the graves GUI menu. |
/home | Teleport to your home. |
/lands | Opens up Lands management gui |
/sethome | Set your player home. |
/spawn | Teleports you to Overworld Spawn Point. |
/togglearmor | toggles your armor visibility to you and others |
/tpa <playername> | Teleport request to another player (they'll need to accept with /tpaccept). |
/tpaccept | Teleport accept an incoming teleport request |
/tpahere <playername> | Teleport request another player to teleport to YOU (they'll need to accept with /tpaccept). |
/warp <warpname> | Teleport to a server warp. |
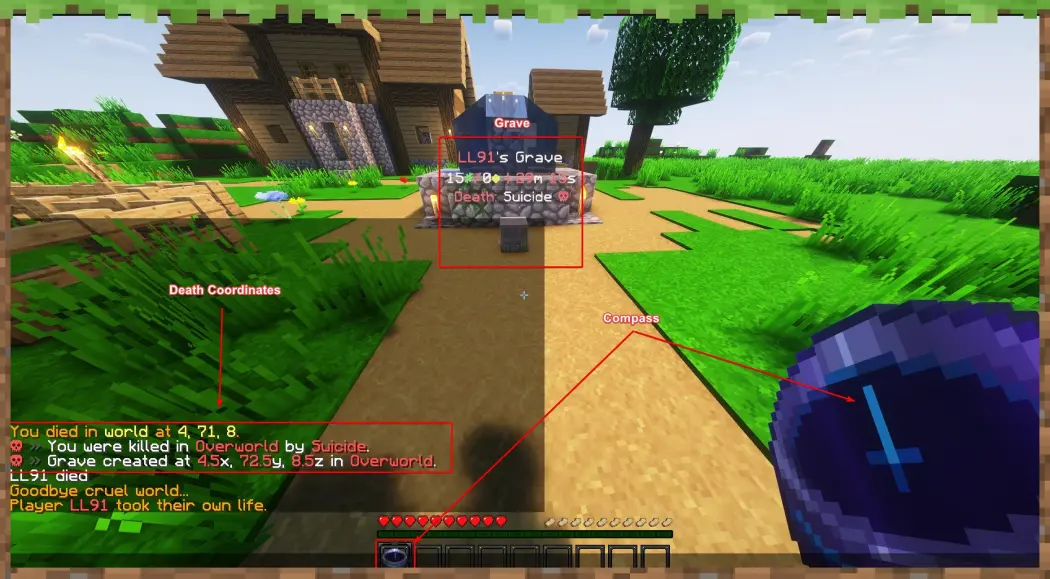
Death
When you die on this server, a gravestone chest drops where you died and that has all the items and 80% of the expierance you have saved in it.
You will be teleported to either:
- Your bed.
- Your nearest home spot set by
/sethomecommand. - The World Spawn if you don't have the above options set.
You have thirty minutes to reach your grave or it will disappear.
Your chat box will display coordinates of your death and give you a compass that points towards your gravestone. Right clicking while the compass is equipped will tell you how many blocks away you are from your gravestone.
You can use the commannd /graves to manage your gravestones as well, great to use if you die multiple times.
Click to see visual guide
Gamplay Tweaks
Here is a list of some notable gamplay tweaks, please read Server Configuration for full list, especially Purpur tweaks.
- All in game recipes are unlocked when you join for the first time.
- Daylight now lasts 15 minutes and Nightime lasts the default 10 minutes.
- Chests found in the world will now refill loot after 12 to 48 hours. EMPTY THEM FOR REFILL TO WORK
- You can now sleep even if mobs are nearby and if other players not in a bed.
- Barrels and Ender Chests now have six rows for storage.
- Chests can be opened even with a block placed on top.
- Blocks with crops or have been tilled can no longer be trampled.
- Villagers can be leashed and lured with emerald blocks.
- You now run faster in grass paths.
Chat Features
Currently all text chat is sent to the default global channel which everyone can see. Below are some additional messaging options that can be sent to specific people.
Essentialsx Chat
/msg <playerName> (message)
- Sends a private message to the target player.
/r (message)
- This quickly and privately responds to the last player who messaged you.
/ignore <playerName>
- Will ignore all private messages from a particular player.
/me (message)
- Emotes in the third person (e.g. "/me smiles" would print "*\<username> smiles")
/messagetoggle
- Toggles your ability to receive private messages from all players.
/mail send <playerName> (message)
- Sends mail to the target player whether online or offline. Usernames for offline players must be accurate.
/mail read
- reads any received mail messages.
/mail clear
- Clears all mail messages from your inbox.
Discord
Currently all global text channel chats are sent to discord in the #server-chat text channel.
Discord users can send text chats to the minecraft server throught this channel as well making it a bidirectional.
Lands Chat
/lands chat <land>
- Activates lands chat channel to message all members of the selected land. use this command againt to toggle off the chat.
- Only those who are toggled to use this chat and are members of that land can see the chats.
Land Claims
You can claim parts of the world for yourself by using the Lands plugin.
This allows you to set up protections against other players, mobs, and various game mechanics in your selected land.
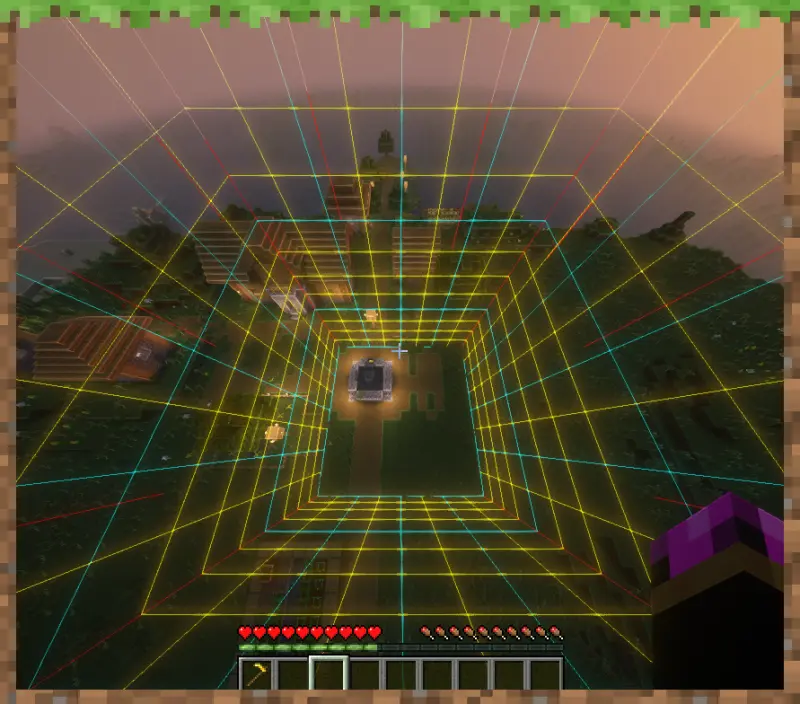
Claims are taken in chunks and a chunk is a 16 x 16 block segment of the world that extends all the way down to the bedrock and up to 256 blocks in height.
Press F3 + G to see chunks in game
Create a Land Claim
When claming chunks please only claim what you'll use in the near future, you can always increase your lands area later.
Type
/lands create <name>Enter the selection mode:
- Type
/lands selectionor use the selection tool (which is a Golden Hoe). - Click both corners of the area you want to claim
- Use left and right click to do so.
- Type
Type
/lands claimto claim the area:- If no selection made, it will claim the chunk you're standing on.
- If no land has been created before, it will automatically create a land with your name.
Edit Land Claims
Open the lands menu to manage your land:
- Type
/lands menu
To use the commands for a different land
- Type
/lands edit <land>- All following commands will be executed for this land.
Select a Land for Editing
Type
/lands edit <land>- Allow following commands will be executed for this land.
Trust Players
Type /lands trust <player> [area or * for whole land]
- Alternatively, open your land menu and go to playersand click on the 'Trust Player' button.
Untrust Players
Type /lands untrust <player> [area or * for whole land]
- Alternatively, open your land menu and go to players and click on the 'Untrust Player' button.
Toggle Permissions for Players
- Open your lands menu by typing
/lands - Click on the roles item
- Open the role settings menu
- Configure the settings to your liking
Promote / Demote Players
- Open your lands menu by typing
/lands - Click on the player's item
- Use left click to promote and right click to demote them
Limits and Disabled Features
Here's a list of current limits set for Lands Claims:
- You can have 2 owned lands.
- Each land can contain up to 100 chunk claims.
- You can have 30 sub areas per land.
- You can have 1 land camp that expires in 24 hours.
These are soft limits that can be increased later by server moderators.
We've disabled the following features of the Lands plugin:
- nations
- renting
- economy
- teleportation
- relations
- wars